Direkt zum Inhalt der Seite
Direkt zur Hauptnavigation
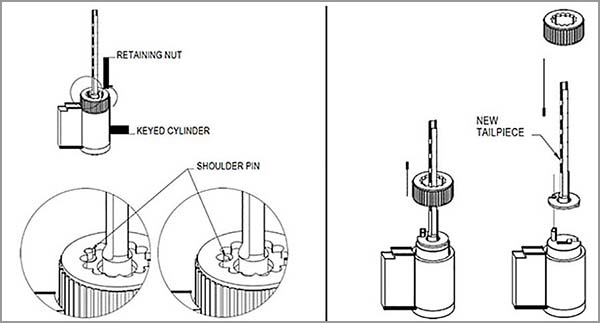
Cylinder Tail Piece Change Instructions
Figure 1
- Orient the Keyed Cylinder with the Keyway down and Tailpiece pointing upward.
- Depress the end of the small Shoulder Pin below the top of the Retaining Nut, allowing the Retaining Nut to turn.
- Rotate the Retaining Nut (counter-clockwise) until it can be separated from the Keyed Cylinder body.
Figure 2
- Remove the Retaining Nut and set it aside for re-attachment.
- Remove the old Tailpiece and replace it with the new longer Tailpiece in the same orientation.
- Slip the Retaining Nut over the new Tailpiece and start turning it (clockwise) onto the threads of the Keyed Cylinder body.
- Depress the end of the Shoulder Pin allowing the Retaining Nut to be tightened onto the Keyed Cylinder body.
- Allow the Shoulder Pin to engage with one of the semi-circular cutouts in the Retaining Nut by slightly turning the Retaining Nut counter-clockwise.
- Insert key into the Keyed Cylinder and operate to insure that the Retaining Nut is not too tight.