HLS® 9000 Dallas Sliding Door Handle Set Installation Instructions

A Phillips screwdriver is required.
A 3 mm hex key is required.
A hacksaw is required for keyed handle sets.
Use water and a soft cloth to clean. Do not use metal cleaners or abrasive cleaners.
With the door in the open position and the lock in the unlocked position …
- For keyed handle sets for 1-3/4” doors, cut 18 mm [0.71”] from the end of the cylinder tail piece using a hacksaw.
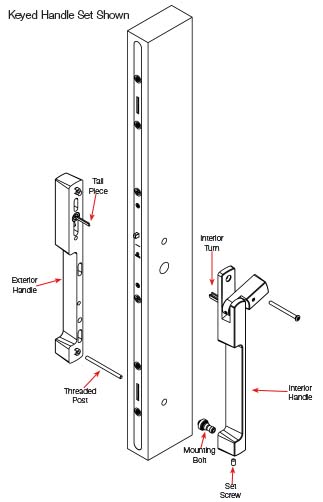
- Install the Threaded Post into the bottom of the Exterior Handle (no tool required). TIP: make sure the Threaded Post is fully threaded into the Exterior Handle.
- Orient the Tail Piece as needed to engage the lock and Interior Turn.
- For non-keyed handle sets including a Tail Piece, the Tail Piece is installed as a loose part in the lock and will be captured between the Exterior Handle and Interior Handle.
- For keyed handle sets, make sure the orientation of the Tail Piece is such that the tail piece can rotate freely from the locked to the unlocked position. Improper orientation will prevent lock function.
- Position the Exterior Handle on the face of the door.
- Thread the Mounting Bolt onto the Threaded Post until the bolt fits flush against the door with no movement.
- Position the Interior Handle on the face of the door as shown. Note the position of the Interior Turn. TIP: if needed, rotate the Interior Turn slightly in either direction to align the Tail Piece with the slot of the Interior Turn.
- Install the Set Screw in the bottom of the Interior Handle using a 3 mm hex key.
- Holding the Interior Handle onto the face of the door, install the Mounting Screw using a Phillips screw driver.
- With the door closed, confirm handle and lock function by rotating Thumb Turn. If acceptable, tighten the Set Screw and Mounting Screw.
Note:
for dummy handle sets, skip steps 2 and 8 above.